Using Xbox Kinect V2 Within Robot Operating System for Outdoors Obstacle Detection
Written by Robert Crimmins (ECE/RBE)
Advised by Professor Alexander Wyglinski (ECE/RBE)
May 2018 – December 2018
A Directed Research Submitted to the Faculty of Worcester Polytechnic Institute in Partial Fulfillment of the Requirements for the Degree of Master of Science.
Download Full PDF (34 pages)WPI Directed Research Cover
01
01 Introduction
The purpose of this directed research is to replicate the works of Javier Hernandez-Aceituno, Rafael Arnay, Jonay Toledo, and Leopoldo Acosta with obstacle detection outdoors. The goal is to integrate cost-effective off-the-shelf hardware to assist autonomous vehicles in navigation, mapping, and planning. Offerings such as the Microsoft Xbox Kinect were developed with advanced sensors at competitive prices for consumers. These devices feature wide-angle time-of-flight cameras, active infrared sensors, and high-resolution RGB cameras. This sensor suite aligns perfectly with the needs for low speed autonomous vehicles.
This research will be utilized on a drive-by-wire architecture golf cart being developed at the Wireless Innovation Laboratory at Worcester Polytechnic Institute. The hardware focused on in this paper is the Microsoft Xbox Kinect V2.
Table 1: Comparison between the Kinect V1 and Kinect V2
| Feature | Kinect V1 | Kinect V2 |
|---|---|---|
| Color Camera | 640 × 480 | 1920 × 1080 |
| Depth Camera | 320 × 240 | 512 × 424 |
| Max Depth Distance | ~4.5 m | ~4.5 m |
| Min Depth Distance | 40 cm | 50 cm |
| Horizontal FOV | 57° | 70° |
| Vertical FOV | 43° | 60° |
| Depth Technology | Structured Light | Time of Flight |
| Tilt Motor | Yes | No |
| Skeleton Joints Defined | 20 joints | 26 joints |
| Full Skeletons Tracked | 2 | 6 |
| USB | 2.0 | 3.0 |
Although there are many pros associated with the second-generation Kinect, there are some limitations. The Kinect V2 was not widely adopted and was considered by Microsoft's gaming audience as a market failure. As of October 25, 2017, the Xbox Kinect V2 was officially discontinued. Furthermore, the USB 3.0 / AC adapter was discontinued in January 2018. Despite these hurdles, the sensor's performance should still be researched for low speed autonomous vehicles.
The results we are attempting to replicate are from the University of La Laguna in Spain. Their team focused on classifying smooth, tilted, and navigable surfaces. They proved that the Kinect is superior to other technologies such as ultrasonic sensors or stereoscopic cameras in performance. For this research we will look at: setting up the environment, calibrating the cameras, establishing a bridge between raw data and Robot Operating System (ROS), and assessing the performance of the sensor.
02
02 Setting Up the Environment
I faced many challenges in setting up the software environment. Initially, I wanted to use the Xbox Kinect through an Ubuntu virtual machine through Window's Hyper-V. After some research, Hyper-V does not support Enhanced Sessions, which allows direct passthrough of USB devices to an Ubuntu virtual machine.
I decided to go with a bare metal installation on a standalone computer. I opted to use Ubuntu 14.04 LTS as others have reported stable performance on this build. I installed Robot Operating System (ROS) for Ubuntu Indigo:
sudo sh -c 'echo "deb http://packages.ros.org/ros/ubuntu $(lsb_release -sc) main" > /etc/apt/sources.list.d/ros-latest.list'
sudo apt-key adv --keyserver hkp://ha.pool.sks-keyservers.net:80 --recv-key 421C365BD9FF1F717815A3895523BAEEB01FA116
sudo apt-get update
sudo apt-get install ros-indigo-desktop-full
apt-cache search ros-indigo
I then initialized rosdep:
sudo rosdep init
rosdep update
Quality-of-life fix so ROS environment variables are automatically added to bash:
echo "source /opt/ros/indigo/setup.bash" >> ~/.bashrc
source ~/.bashrc
Set up the ROS environment and verify paths:
printenv | grep ROS
source /opt/ros/indigo/setup.bash
I then installed Catkin, which is a low-level build system macro for ROS:
mkdir -p ~/catkin_ws/src
cd ~/catkin_ws/
catkin_make
echo $ROS_PACKAGE_PATH
The following should be returned in terminal:
/home/<youruser>/catkin_ws/src:/opt/ros/indigo/stacksI then installed libfreenect2, the open source driver for the Kinect V2:
git clone https://github.com/OpenKinect/libfreenect2.git
cd libfreenect2
sudo apt-get install libfreenect
cd depends; ./download_debs_trusty.sh
sudo apt-get install build-essential cmake pkg-config
Install libusb for generic USB device access:
sudo dpkg -i debs/libusb*debBuild the directory:
mkdir build && cd build
cmake .. -DCMAKE_INSTALL_PREFIX=$HOME/freenect2
make
make install
Set up udev rules for device access:
sudo cp ../platform/linux/udev/90-kinect2.rules /etc/udev/rules.d/I encountered an issue where my Kinect hardware carried the "Xbox" branding, intended for the game console. To fix this, we augment our hardware IDs into the rules file. To look for the hardware IDs:
$usb-devices
$dmesg | grep "045e"
My device was not found in the list. Per community recommendations, I reinstalled dependencies and confirmed it was a USB 3.0 issue. Installing a newer kernel fixed it:
sudo apt-get install linux-generic-lts-wilyMy Kinect USB device information:
VendorID: 045e
ProductID: 02c4
I modified the udev rules files to add my ProductID (02c4) as a valid USB device. Some files are read-only or protected:
sudo nano <directory> / <filename>Test that libfreenect2 is properly installed:
./bin/Protonect03
03 Calibrating the Kinect and Establishing a Bridge to ROS
We will now install kinect2_bridge, which transfers raw data from the camera to ROS via topics.
cd ~/catkin_ws/src/
git clone https://github.com/code-iai/iai_kinect2.git
cd iai_kinect2
rosdep install -r --from-paths .
cd ~/catkin_ws
catkin_make -DCMAKE_BUILD_TYPE="Release"
Run ROS core in another terminal, then launch kinect2_bridge:
roscore
# In another terminal:
roslaunch kinect2_bridge kinect2_bridge.launch
View what kinect2_bridge passes to ROS applications:
rosrun kinect2_viewer kinect2_viewer kinect2 sd cloudThe first thing you will notice is that the cameras are not calibrated to each other. This is because the cameras are physically offset from one another:
Figure 1: RGB Camera and IR Sensor Orientation on Kinect Mainboard
Figure 2: Pre-Calibration Photo — RGB and IR Sensor are Not Aligned
For calibration, I used the chess5x7x0.03 pattern. It is very important to print this file without any scaling. Using a digital caliper, ensure the points of the squares are 3 cm apart diagonally.
First, limit the frame rate of kinect2_bridge:
rosrun kinect2_bridge kinect2_bridge _fps_limit:=2Create a directory for calibration data:
mkdir ~/kinect_cal_data; cd ~/kinect_cal_dataCalibrate the RGB camera (record ~40 photos covering the entire viewing window at different angles):
rosrun kinect2_calibration kinect2_calibration chess5x7x0.03 record colorFigure 3: RGB Camera Calibration Example
Figure 4: IR Sensor Calibration Example
Calibrate intrinsics, then repeat for remaining cycles:
rosrun kinect2_calibration kinect2_calibration chess5x7x0.03 calibrate color

rosrun kinect2_calibration kinect2_calibration chess5x7x0.03 record ir
rosrun kinect2_calibration kinect2_calibration chess5x7x0.03 calibrate ir

rosrun kinect2_calibration kinect2_calibration chess5x7x0.03 record sync
rosrun kinect2_calibration kinect2_calibration chess5x7x0.03 calibrate sync

rosrun kinect2_calibration kinect2_calibration chess5x7x0.03 record depth
rosrun kinect2_calibration kinect2_calibration chess5x7x0.03 calibrate depth
Figure 5: Physical Setup of Kinect and Calibration Photo
Figure 6: RGB Camera Calibration Sample Set
Figure 7: IR Sensor Calibration Sample Set
Copy generated calibration files to the Catkin workspace using the Kinect serial number:
roscd kinect2_bridge/data; mkdir 021177340347
# Copy the following files:
# calib_color.yaml
# calib_depth.yaml
# calib_ir.yaml
# calib_pose.yaml
Figure 8: Distortion Coefficients Within the YAML Files
Restart kinect2_bridge with calibration parameters:
roslaunch kinect2_bridge kinect2_bridge.launchFigure 9: Post-Calibration Photo — RGB and IR Sensors Aligned
My first attempt with 12 photos per cycle (48 total) was not enough. I had to expand to 40 photos per cycle (160 total) for decent results. The author states data sets over 100 photos per cycle (400 total) will have very accurate calibration.
Use kinect2_bridge to publish data to ROS topics for RViz:
roslaunch kinect2_bridge kinect2_bridge.launch publish_tf:=true
# In another terminal:
rosrun rviz rviz
Change the Frame to kinect2_link. Then import models and add features via the topics tab.
04
04 Results
I then moved testing outdoors. Following the University of La Laguna's recommendation, I placed the Kinect approximately 12 inches off the ground, tilted slightly downward. I used a tape measure to mark one-foot increments and placed soda cans every 12 inches apart from the Kinect. There are 6 cans with the furthest being 7 feet away. Soda cans are similar in height to curbs, making them great for testing.
Figure 10: Outdoors Testing Layout
Figure 11: Height Comparison to Curb
Figure 12: Protonect Test Software Confirms Kinect Configuration
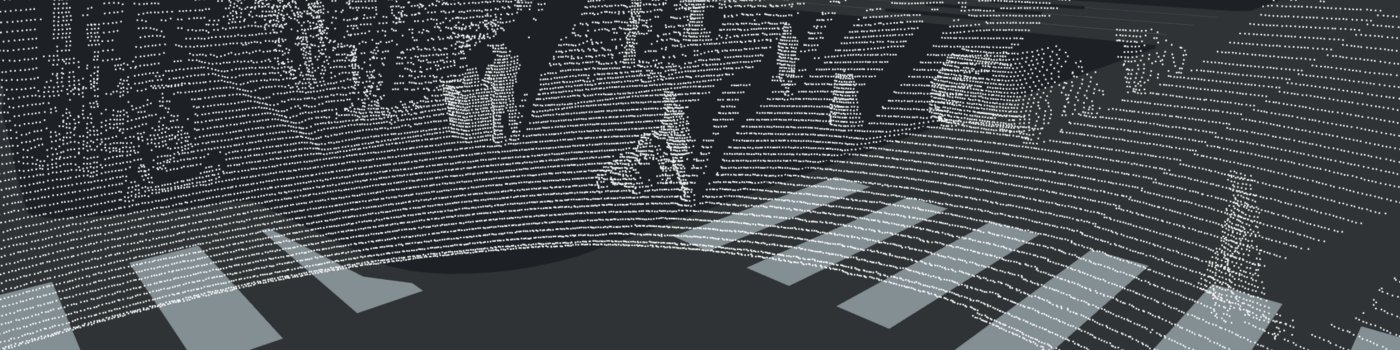
Figure 13: RViz Showing Cans via Point Cloud ROSTopic
If we map colors to distance on the point cloud, we can get a better idea of what the Kinect sees:
Figure 14: 3D Isometric View of Color Mapped Point Cloud
Figure 15: 3D Top View of Color Mapped Point Cloud
Figure 16: 3D Front View of Color Mapped Point Cloud
Figure 17: 2D Front View of Color Mapped Point Cloud
Figure 18: 2D Front View of Grayscale Point Cloud
Figure 19: 2D Front View of Infrared Raw Image
Figure 20: Protonect Viewer — Box 2 Feet Away from Kinect
Figure 21: Protonect Viewer — Box 7 Feet Away from Kinect
05
05 Conclusion
After following the recommendations of the University of La Laguna students, we were able to achieve similar results. By placing the Xbox Kinect camera low to the ground, the Kinect is able to distinguish the difference between its own infrared signals and external light radiation interference.
For future research, if we conduct a larger calibration set, we can have higher accuracy. Once fixed to a golf cart or other autonomous vehicle, and ground clearances are known, obstacle height can become a more useful metric. In the Verdino project, they took the normal lines of the surfaces and determined if they were navigable by the golf cart.
From this research, we can see that the Xbox Kinect V2 Sensor is a very capable and cost-effective solution that can be purposed for computer vision applications. Although with its increasing age, discontinuation of parts, and diminishing software support online, it may not be the best solution to implement compared to others offered on the market. There has been an increasing emergence of RealSense cameras being used in ROS for robotics applications.
With the emergence of these cost-effective hardware components we are seeing engineers repurpose these sensors into new applications. With software such as Robot Operating System, we are creating smarter robots that utilize sensor fusion to more accurately sense and manipulate its environment.
06
06 References
Show all references (↓)
- iai_kinect2 — Tools for using Kinect V2 in ROS
- kinect2_calibration — OpenCV calibration tool
- libfreenect2 — Open source drivers for Kinect V2
- libfreenect2 Troubleshooting Wiki
- libfreenect2 #193 — Xbox branding udev rules workaround
- ROS Indigo Installation for Ubuntu 14.04
- Catkin — Build system for ROS
- ROS Environment Configuration Tutorial
- Creating Catkin Workspaces
- depth_image_proc — Processing Depth Images in ROS
- RTABMAP — Mapping and Localization using OpenNI
- RGBD_Launch — Launch files for RGB-D devices in ROS
- Tutorial for vision, mapping, and localization with Kinect V1 in ROS
- Verdino Project Page
- Indoor Obstacle Detection System Using Depth Information and Region Growth
07
07 Appendices
Appendix A: calib_color.yaml
%YAML:1.0
cameraMatrix: !!opencv-matrix
  rows: 3
  cols: 3
  dt: d
  data: [ 1.1617963678371680e+03, 0., 9.5093383475668224e+02, 0.,
          1.2110595550377591e+03, 5.2654387243856411e+02, 0., 0., 1. ]
distortionCoefficients: !!opencv-matrix
  rows: 1
  cols: 5
  dt: d
  data: [ 5.4341306125840788e-02, -5.2326511693269059e-02,
          -1.4156323021479405e-02, -4.5905877433509764e-03,
          1.3436815684838805e-02 ]
rotation: !!opencv-matrix
  rows: 3
  cols: 3
  dt: d
  data: [ 1., 0., 0., 0., 1., 0., 0., 0., 1. ]
projection: !!opencv-matrix
  rows: 4
  cols: 4
  dt: d
  data: [ 1.1617963678371680e+03, 0., 9.5093383475668224e+02, 0., 0.,
          1.2110595550377591e+03, 5.2654387243856411e+02, 0., 0., 0., 1.,
          0., 0., 0., 0., 1. ]
Appendix B: calib_depth.yaml
%YAML:1.0
depthShift: -1.4106589553147419e+01
Appendix C: calib_ir.yaml
%YAML:1.0
cameraMatrix: !!opencv-matrix
  rows: 3
  cols: 3
  dt: d
  data: [ 3.8952059999562010e+02, 0., 2.5673175566817639e+02, 0.,
          4.0711960284607386e+02, 2.1195820796180755e+02, 0., 0., 1. ]
distortionCoefficients: !!opencv-matrix
  rows: 1
  cols: 5
  dt: d
  data: [ 1.2745334821987084e-01, -3.3936384531433733e-01,
          -5.5842671244626932e-03, -2.3722223949202751e-03,
          1.0172808241454298e-01 ]
rotation: !!opencv-matrix
  rows: 3
  cols: 3
  dt: d
  data: [ 1., 0., 0., 0., 1., 0., 0., 0., 1. ]
projection: !!opencv-matrix
  rows: 4
  cols: 4
  dt: d
  data: [ 3.8952059999562010e+02, 0., 2.5673175566817639e+02, 0., 0.,
          4.0711960284607386e+02, 2.1195820796180755e+02, 0., 0., 0., 1.,
          0., 0., 0., 0., 1. ]
Appendix D: calib_pose.yaml
%YAML:1.0
rotation: !!opencv-matrix
  rows: 3
  cols: 3
  dt: d
  data: [ 9.9995022488478558e-01, -8.2249935015495275e-03,
          5.6477636960330958e-03, 8.1240660106269812e-03,
          9.9981092762976043e-01, 1.7666594000347129e-02,
          -5.7920034808118664e-03, -1.7619831838516332e-02,
          9.9982798231578851e-01 ]
translation: !!opencv-matrix
  rows: 3
  cols: 1
  dt: d
  data: [ -6.4840180891407320e-02, -7.2503333571428330e-03,
          3.2835706161128547e-02 ]
essential: !!opencv-matrix
  rows: 3
  cols: 3
  dt: d
  data: [ -2.2476548831694171e-04, -3.2701748181810132e-02,
          -7.8291812610523301e-03, 3.2458517206651723e-02,
          -1.4125465534796490e-03, 6.5014475542836958e-02,
          6.7232065612618510e-03, -6.4887555349465983e-02,
          -1.1045569811989500e-03 ]
fundamental: !!opencv-matrix
  rows: 3
  cols: 3
  dt: d
  data: [ -3.7834409191198661e-07, -5.2666773679931942e-05,
          6.1268997240825317e-03, 5.2414387906345340e-05,
          -2.1823933439006541e-06, 2.7900396704276943e-02,
          -1.4090570396367210e-02, -7.0179015355884777e-02, 1. ]